I’m getting a wood burner – I wasn’t going post about this until after I’d got it installed but there has been a minor set back (the factory sent the wrong one) and this weekend I finally got over my analysis paralysis regarding the hearth. Plus I’m feeling a bit jet lagged because the clocks went back – I’ve been in my pyjamas since 6pm but it’s no where near bedtime yet.
So, if you remember, the fireplace in the living room looked like this.
It looked like that until about a month ago (diet coke can included), although I did make a fire with the blocks I’d bashed off the compost bin pallets, one chilly day in April. Dave and Katie were going to stop by so Katie could identify some of the plants / weeds in my garden for me – I had an hour or so to kill before they arrived so it wasn’t worth going home but it was too cold to stay, so I pulled one of the Kai Kristiansen chairs up to the fire, got out my crochet (must have been baby blanket number 1 – I’m now on number 4) and listened to Nicholas Nickleby on audiobook – who says I’m not 85?

Anyway, back on topic – why am I getting a woodburner? I knew I didn’t want an open fire (more about that in a minute) but to be honest, apart from a mild pyromania (does every one have that?) – I wasn’t even sure I wanted a wood burner, I’m under no delusions that I’ll ever get back my initial outlay by saving on heating and sourcing, storing and chopping logs is a lot of work (I had enough of that running the chalet in Chamonix). It was more because I didn’t really want to just block the space up and I guess because with all the waiting on planning and building regs I felt like this was at least something that could be done right now (if that’s not a terrible justification I don’t know what is).
So which woodburner? Well, first I have to have a minor rant about open fires to set the scene. Open fires are horrendously inefficient and if you use them in a centrally heated / thermostat controlled house they will actually cause your oil / gas bill to go up. There’s the obvious “hole in the ceiling” issue and then there is the draw of the fire itself – taking the warm (centrally heated) air from your house up the chimney and causing it to be replaced with cold air from outside (hence the draughts). It says here that an open fire can draw up to 17 cubic metres of air a minute and here that it’s 260 cubic metres or more per hour (4.33 cubic metres or more per minute). Bearing in mind the “up to” and “or more” quantifiers and the two very different purposes of those sources – let’s split the difference and call it 13 cubic metres. My house presently (ignoring the proposed extension) contains about 190 cubic metres of air. So, using the 13 cubic metres figure, the entire air contents of the house could be dragged up the chimney in just under 15 minutes. That’s four times the air volume of the house every hour just disappearing up the chimney. You can imagine what’d happen to your heating bill if the thermostat was trying to keep the rest of the house warm at the same time – plus there’s the cost of the solid fuel you are burning. Nope, it’s definitely better (efficiency-wise) to just block up the fireplace than have an open fire – which is pretty much what everyone did until woodburners became ubiquitous.
My Dad (83) is quite possibly the least sentimental person on the planet, he sees no value in antiquity or traditions and despises anything inefficient. The suggestion that anyone might want to have a fire in their house because it’s a feature or because it feels cosy is met with complete incredulity. While woodburners are undoubtedly more efficient than open fires they do still need air to burn and if I was going to avoid (or rather reduce) being lectured for the rest of time I needed to find a woodburner which could draw unheated air from outside the house.
An external air intake is more common feature in larger stoves which need a lot more air to function – I only needed a little (<5kw) stove so it was pretty hard to find one with this feature. In fact, I think I only found three – the Charnwood C-Four, the Charnwood Cove 1 (with optional kit) and the Morso Badger (with optional kit). Comparing their physical size, looks and price – I decided to go with the Charnwood C-Four.

Due to the complication of having another fireplace back to back with this one and because the Charnwood C-Four came with a number of options which I was unsure whether to order or not (the stand and rear flue adapter) – I arranged for the chimney sweeps (who also install stoves) to come back and bash out the fireplace first so I could be sure what to order. Apparently they usually bash the space out to fit the stove and not the other way around so I promised to make a model – which I did, to scale out of cardboard. Then I discovered that Charnwood have an augmented reality app which allows you to visualise what your stove would look like installed. It’s not terribly useful when there isn’t yet a hole but here are the two ‘models’ side by side. Like twins, huh? I think the virtual model is a little small but the cardboard does have some bounce to it which makes it stand larger than its actual dimensions.

Here’s the alcove after it was bashed out with a new concrete lintel (I say new but there wasn’t a lintel there before at all – scary as the chimney breast is load bearing!) and lined with hardibacker. The white underneath the virtual model it is the paper anchor to tell the app where to impose the model.

The white bar to the side (there is also one under the stove) is a piece of wood which was put in place before the concrete was poured, it creates a channel to the crawl space under the house (which is ventilated with air bricks) thus providing external air to the stove. In a house where the fire is on an outside wall you’d be able to bore a hole straight out from the back of the stove but as this is an internal chimney we had to do it this way. I was a little wary that we’d just be making draughts come up between the floorboards but even Dad doesn’t seem to think that’s much of an issue so I guess it must be fine.

And with the cardboard model – as you can see the decision was no stand (there’s not enough height) and to use the external flue adapter (which is velcroed on).

So you can see from the photo above the wood channel bit didn’t quite go to plan – I was told to leave the wood in place for 24 hours. But by that time I was off island for 5 days so it ended up being a week before I tried to take the wood out – it was pretty stuck. I had to use the crow bar. The strip of concrete between the structural hearth and channel on the left hand side just came away and the right handside cracked completely in two.
N.B. The tiles are because I was liked the idea of a modern take on an Edwardian tiled hearth (and around the alcove) so was trying these out for scale.

This photo is from much later when I painted the inside of the hardibacker board using masonry paint I found in Dad’s loft – it was so runny, that’s why there is paint all over the hearth (it might actually have been white wash). Anyway, you can see that when I reconcreted I left a wider channel both at the front (which I left as was) and in the middle – the air intake is 64mm diameter and I don’t think the previous channel was quite large enough. See the black bar on the left of the photo – that’s the piece of wood, this time I wrapped it in a bin liner! Also on account of the wood the hearth didn’t level properly so it was actually higher in the middle – there wasn’t that much in it but when you’re laying something dead flat across the whole area of it, it was like a seesaw – so I had to grind down the cement, which was an insanely dusty job – it’s still a bit out but I think it’s within the tolerance where it can be levelled with tile adhesive now.

So at the beginning I wanted a nice big piece of smooth slate for the hearth – I went to the monumental mason and mentioned ‘snooker table slate’, they said ‘funnily enough that’s exactly what we have’ but he said it’d be roughly £500 which was a lot more than the price I had in mind. It seems you can get it for much less in the UK but postage to the island was prohibitive. So I um’d and ah’d and laid out tiles. I visited five separate tile shops during my indecision, they all told me it was a bad idea to consider putting ceramic tiles on a hearth and porcelain floor tiles were the way to go but none of them had any that I really liked – which ever way I worked it was going to end up with grout lines that I wasn’t happy with. I kept looking at the local classifieds then one day, up popped this slate heath – £15. The people selling it had bought it a few of years ago for £250 and had a wood burner on it but they recently enlarged the fireplace opening back to its original size and so this was too small. They decided it was better to let it go cheap than to go to waste 🙂
I had to cut the corners out to fit in into the fireplace (which is what I’m doing above), I was a bit worried about how to do that but with a diamond blade the grinder went through it like butter.
It actually isn’t deep enough for my fireplace (the hearth has to extend 30cm in front of the stove) but I figured I’d work something out. Via another visit to another tile shop (I was running out of places where I could show my face by now) I ended up in B&Q where they had boxes of slate tiles (300 x 600). It’s pretty poor quality stuff and it’s riven not smooth like the hearth but it’s not a bad colour match and they sell sample tiles for £4.95 – I realised I only actually needed one as I could cut it into three. So I picked the best one and cut it up.
Now Charnwood don’t supply any information about the air inlet for the C-Four bar a measurement on the diagram which says the spigot has a 64mm outside diameter and 61mm inside diameter. I asked the guy supplying the stove if Charnwood produced a pipe to fit this and he said no, he also didn’t know where I could get one from. He’s the only guy who supplies Charnwood on the Isle of Man and he doesn’t have a showroom or keep stock so I couldn’t go to see it either. I called Charnwood to see what the deal was and was told the spigot sticks out a couple of millimetres and I needed a pipe with an inside diameter of 64mm to fit over the spigot. Well, that turned out to be a near impossible challenge as a “standard” 2.5in pipe is equivalent to 63mm in metric and I didn’t know if it would stretch the 1mm or not. Anyway after much searching I found a 65mm i/d air duct pipe and I hope I’ll be able to fix it with a jubilee clip. I ordered it but when it arrived it was clear that it wasn’t going to be able to bend 180 degrees in order to run down the channel (the spigot is right at the bottom of the stove so basically it would have to turn right around on itself). The pipe can bend 90 degrees fairly tightly (and it can bend up and out too) so I then needed something to hold it in place above the channel – so I ordered an aluminium flange (for 63mm duct).

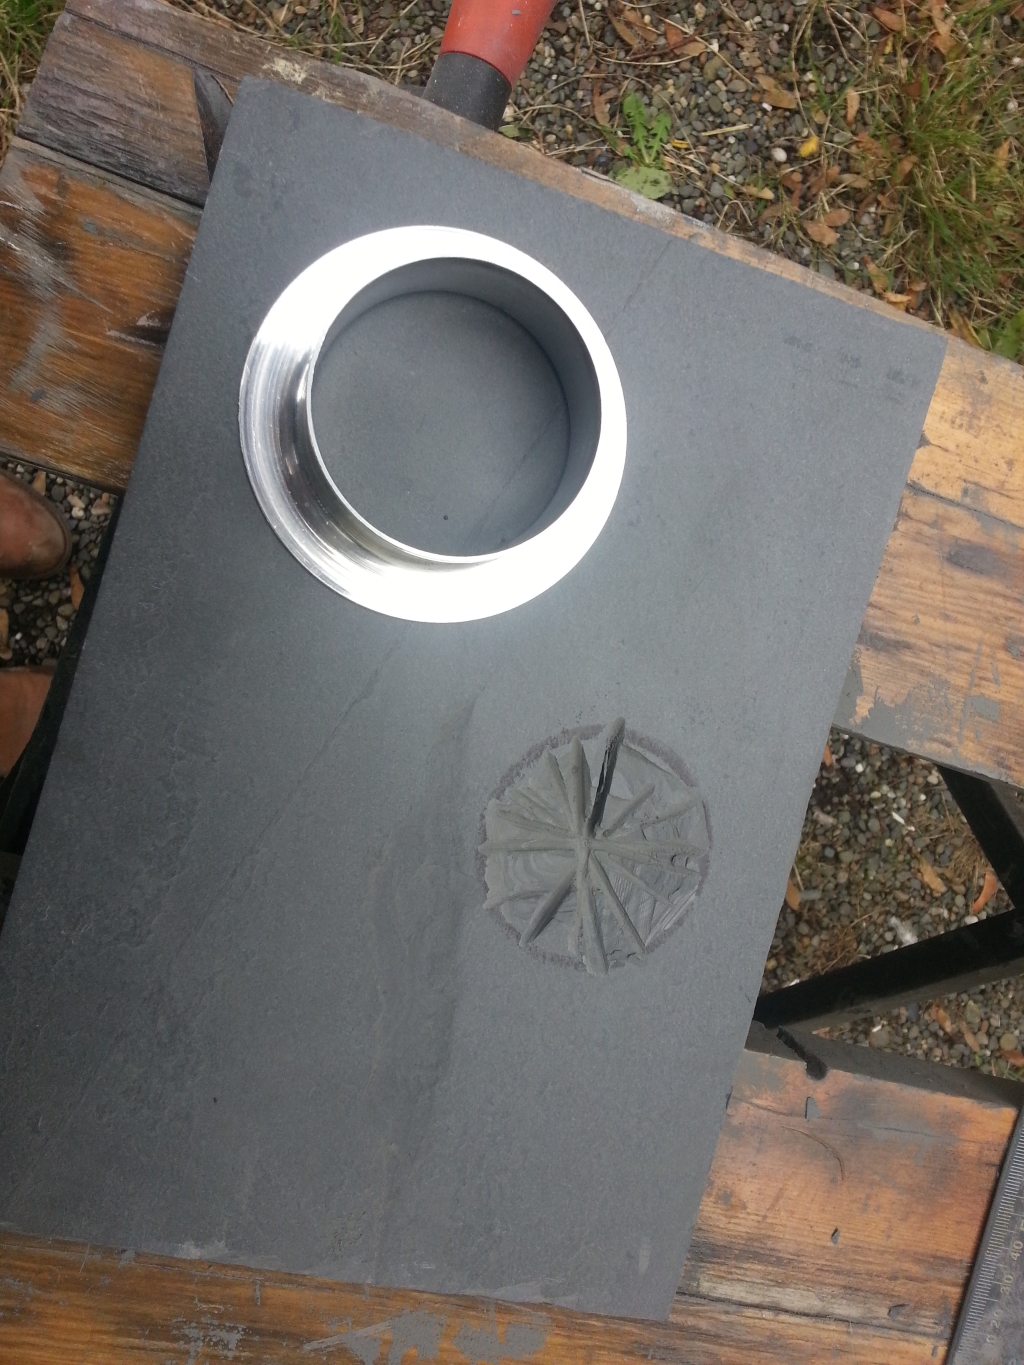
The next problem is cutting the circle in the central tile for the flange (the circle is off-centre because I widened the channel – it won’t be noticeable behind the stove). I experimented with the grinder but I wasn’t really expecting it to work so I took it to Dad and he drilled it out for me (which went a lot faster after I went to Ken Quines and bought a glass drill bit).

It’s obviously not installed here (the bubble wrap was to make it easier for me to slide it around – that thing is heavy!) but you can see the general idea. The hearth is 20mm thick and the tiles are about 10mm but I’ve raised it with some 6mm ‘No More Ply’ cement board which I bought when I thought I was going to tile it all. The centre tile looks much darker here because Dad put some lubricating oil on it when drilling – I’ve since sanded it and it’s back to the same colour as the others.
See that masking tape on the wall? There’s another story there but one that I fear won’t have a happy outcome, I suspect I may have wasted £30 and a Saturday afternoon but I think I’m going to have to leave it on that dramatic cliff hanger. To be continued…